• Skip to main content
  • Skip to header right navigation
  • Skip to site footer

+1 888 767 9990

Material Studio Login

9Wood

9Wood

Home Custom wood ceilings made fast.

  • Products
        • Custom made fast

          Go to Grilles
          Go to Linears
          Go to Acoustics
          Go to Nanoperf
          Go to Tiles
          Go to Cubes
          Go to Waves
          Go to Hybrids
          Go to Baffles

          Product Systems

          Products by Series

          Products by Function

          Material Studio

  • Products
    • Custom Made Fast
    • Grilles
    • Linears
    • Acoustics
    • Nanoperf
    • Tiles
    • Cubes
    • Waves
    • Hybrids
    • Baffles
    • Products By Series
    • Product Systems
  • Inspiration
        • Species
          • Solid Hemlock
          • Cherry
          • Walnut
          • White Oak
          • White Maple
        • Conditions
          • Fixtures integration
          • Lighting
          • Wall products
          • Scrim & fabrics
          • Accessibility
          • Ceiling to wall transitions
          • Trim matching
          • Clouds
          • Exterior
        • Project Archives
          • Grilles
          • Linears
          • Acoustics
          • Tiles
  • Sustainability
    • Sustainability
    • Sustainability action plan
    • AIA Materials Pledge
    • Guidance for LEED v4/v4.1
    • Green building systems
    • Certified wood
    • Essential documents
    • HPD repository
    • EPDs
  • Resources
    • Toolbox

      Material Studio
      Species and Finishes
      Standard Stain Colors
      Data Sheets
      Install Guides
      Guide Specs
      Acoustic Tests
      CAD / Revit Models
      PDF Details

      The Field Guide

      5

      Bidding, Submitting, and Installing

      4

      Detailing and Documenting Design

      3

      Specifying – Making Design Decisions

      2

      Specifying – Meeting Performance Requirements

      1

      Researching Wood Finishes To Meet Design Objectives
  • Resources
    • Toolbox
    • Material Studio
    • Species and Finishes
    • Acoustic Tests
    • Guide Specs
    • CAD / Revit Models
    • PDF Details
    • Data Sheets
    • The Field Guide
    • Researching Wood Finishes To Meet Design Objectives
    • Specifying – Meeting Performance Requirements
    • Specifying – Making Design Decisions
    • Detailing and Documenting Design
    • Bidding, Submitting, and Installing
  • About
    • Custom approach
    • Our people
    • Our story
    • Sustainability
    • Career opportunities
  • Contact
    • Contact 9Wood
    • Order a Sample
    • Request a Quote
    • Find a Rep
    • Schedule a CEU Presentation
  1. Home
  2. Blog
  3. How to do Square Cut-Outs for Wood Grilles – 9Wood Field Guides

How to do Square Cut-Outs for Wood Grilles – 9Wood Field Guides

Square Cut-Outs for Wood Grilles

In this video, we’ll be processing in-panel linear cut-outs for 1100 series Cross Piece Grilles. Grilles can be adapted to work with a lot of different mechanical penetrations, such as slot diffusers or linear lighting.

What tools do I need?

Regarding the tools you’re going to need, we’ve shown everything you’re going to need here. In particular, make sure you have the variable-speed jig saw with a reverse-cut blade like this Bosch BR 101. We know that job sites can be tricky when it comes to finding a location to do your cutting, but make sure you have found a safe location where you can do fine detail work.

First steps – verifying the cut

The first step would be verifying with the installing subcontractor exactly what the mechanical penetration will be and how big it is. Once that’s been verified, you will need to measure where it’s going to fit inside your panel and mark that location off inside it. Once the location has been set, you’re going to prep the area with painter’s tape, razor knife it and cover those areas like we’ve shown you before.

Once your primary taping is completed, you’re going to take your measurement again and mark on the tape exactly where you’re going to be making your cut, finalizing it with your square. Shown here, we razor knife at each member and fold down on the exit side of each piece. That ensures that as the blade leaves, you’re not going to have any tear-out.
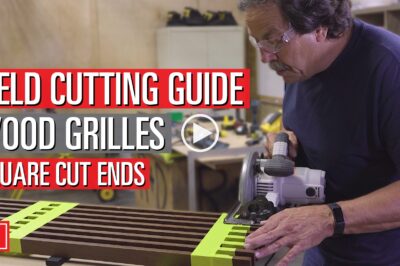
Perform the cut

Keeping the panel face up, you’re going to want to cut cleanly through all of the members that need to be removed. As you begin your cut, it’s important you stay consistent in speed from member to member and that you don’t stop or slow down. This ensures you don’t have tear-out or any problems with the next piece as you cut through one entirely.

What about backers?

Once the face is done, you’re going to flip the panel over to take care of the backers that are still holding those parts in place. We recommend setting a circular saw to the depth of the backers and then cutting them from the back side to ensure that you’re not damaging any of the faces or the secondary surfaces.
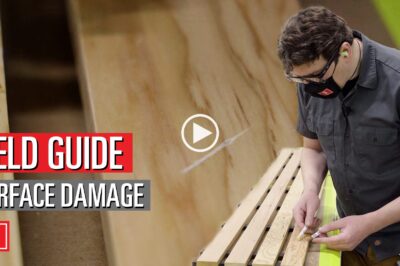
Final steps

Once that’s complete, you’re going to verify the size of your opening, remove the tape, and sand off any fibers that might be remaining. Then you can use the 9Wood-supplied touch-up finish to seal the area and match the color, and install the panel around the mechanical penetration.

If you have any questions about your field cutting or need to go over your project’s specifics, please contact 9Wood and we’ll get in touch with you. Thanks again for watching and we’ll see you next time.

https://www.9wood.com/blog/wood-grilles-in-wood-ceilings-the-most-common-questions-video/

Table of Contents

  • 01 Square Cut-Outs for Wood Grilles
  • 02 What tools do I need?
  • 03 First steps – verifying the cut
  • 04 Perform the cut
  • 05 What about backers?
  • 06 Final steps

You may be Interested

5 min read

Touch-Up for Exterior Wood Ceilings

Have you ever wondered how a simple hair dryer can help you while installing wood ceilings at a jobsite? Exterior wood ceilings need protection. The best way to provide that protection is to ensure all wood surfaces are properly sealed from the elements. Without the proper field treatment, exterior wood ceilings can quickly succumb to …

Read moreTouch-Up for Exterior Wood Ceilings

4 min read

Starting with 9Wood: The Submittal Process

Subcontractors often ask, how do we start with 9Wood? Here are the steps of starting with 9Wood once you have been awarded a wood ceiling.

Read moreStarting with 9Wood: The Submittal Process

4 min read

Repairing Chip-Out & Edge Damage

Minor edge damage and chip-out are the most common type of damage we see out in the field. It disrupts the edge of a wood member and will draw the eye to the area.

Read moreRepairing Chip-Out & Edge Damage

Can we help?

Our team of devoted wood specialists are always on hand and happy to discuss how we can support you.

Get in touch
  • Instagram
  • LinkedIn
  • YouTube

Our products

Custom made fast products

Custom approach

Product systems

Traditional custom service

Projects for inspiration

Conditions gallery

Species gallery

Resources

Sustainability

Guidance for LEED

Pricing guide

Species and finishes

Standard stains

Field guides

CAD/Revit models

The company

Our people

About us

Sustainability action plan

Career opportunities

Learning center

Secure Pay

Terms | Privacy | Cookies

999 South A Street, Springfield, OR 97477

© 2026 9Wood | All rights reserved. | FSC® License Code FSC-C012655. The contents, graphics, design and other matters related to this site are protected under applicable copyrights, trademarks and other proprietary rights. You have a limited license to use the site solely for internal, personal or non-commercial purposes and to print out information from the site solely for internal, personal or non-commercial purposes provided you maintain all copyright and other policies contained therein.

9Wood rocketDon’t forget the crackers! We use cookies to offer you a better site experience and to analyze site traffic. Read about how we use cookies in our privacy policy. If you continue to use this site, you consent to our use of cookies.